The aurora doesn’t wait for you to be ready
In October 2024 I was sitting in a hot tub at Hótel Laxárbakki in northwest Iceland. No one in our group had checked the forecast that evening. No one had their camera out. The sky had been overcast for most of the day and expectations were low.
Then someone looked up.
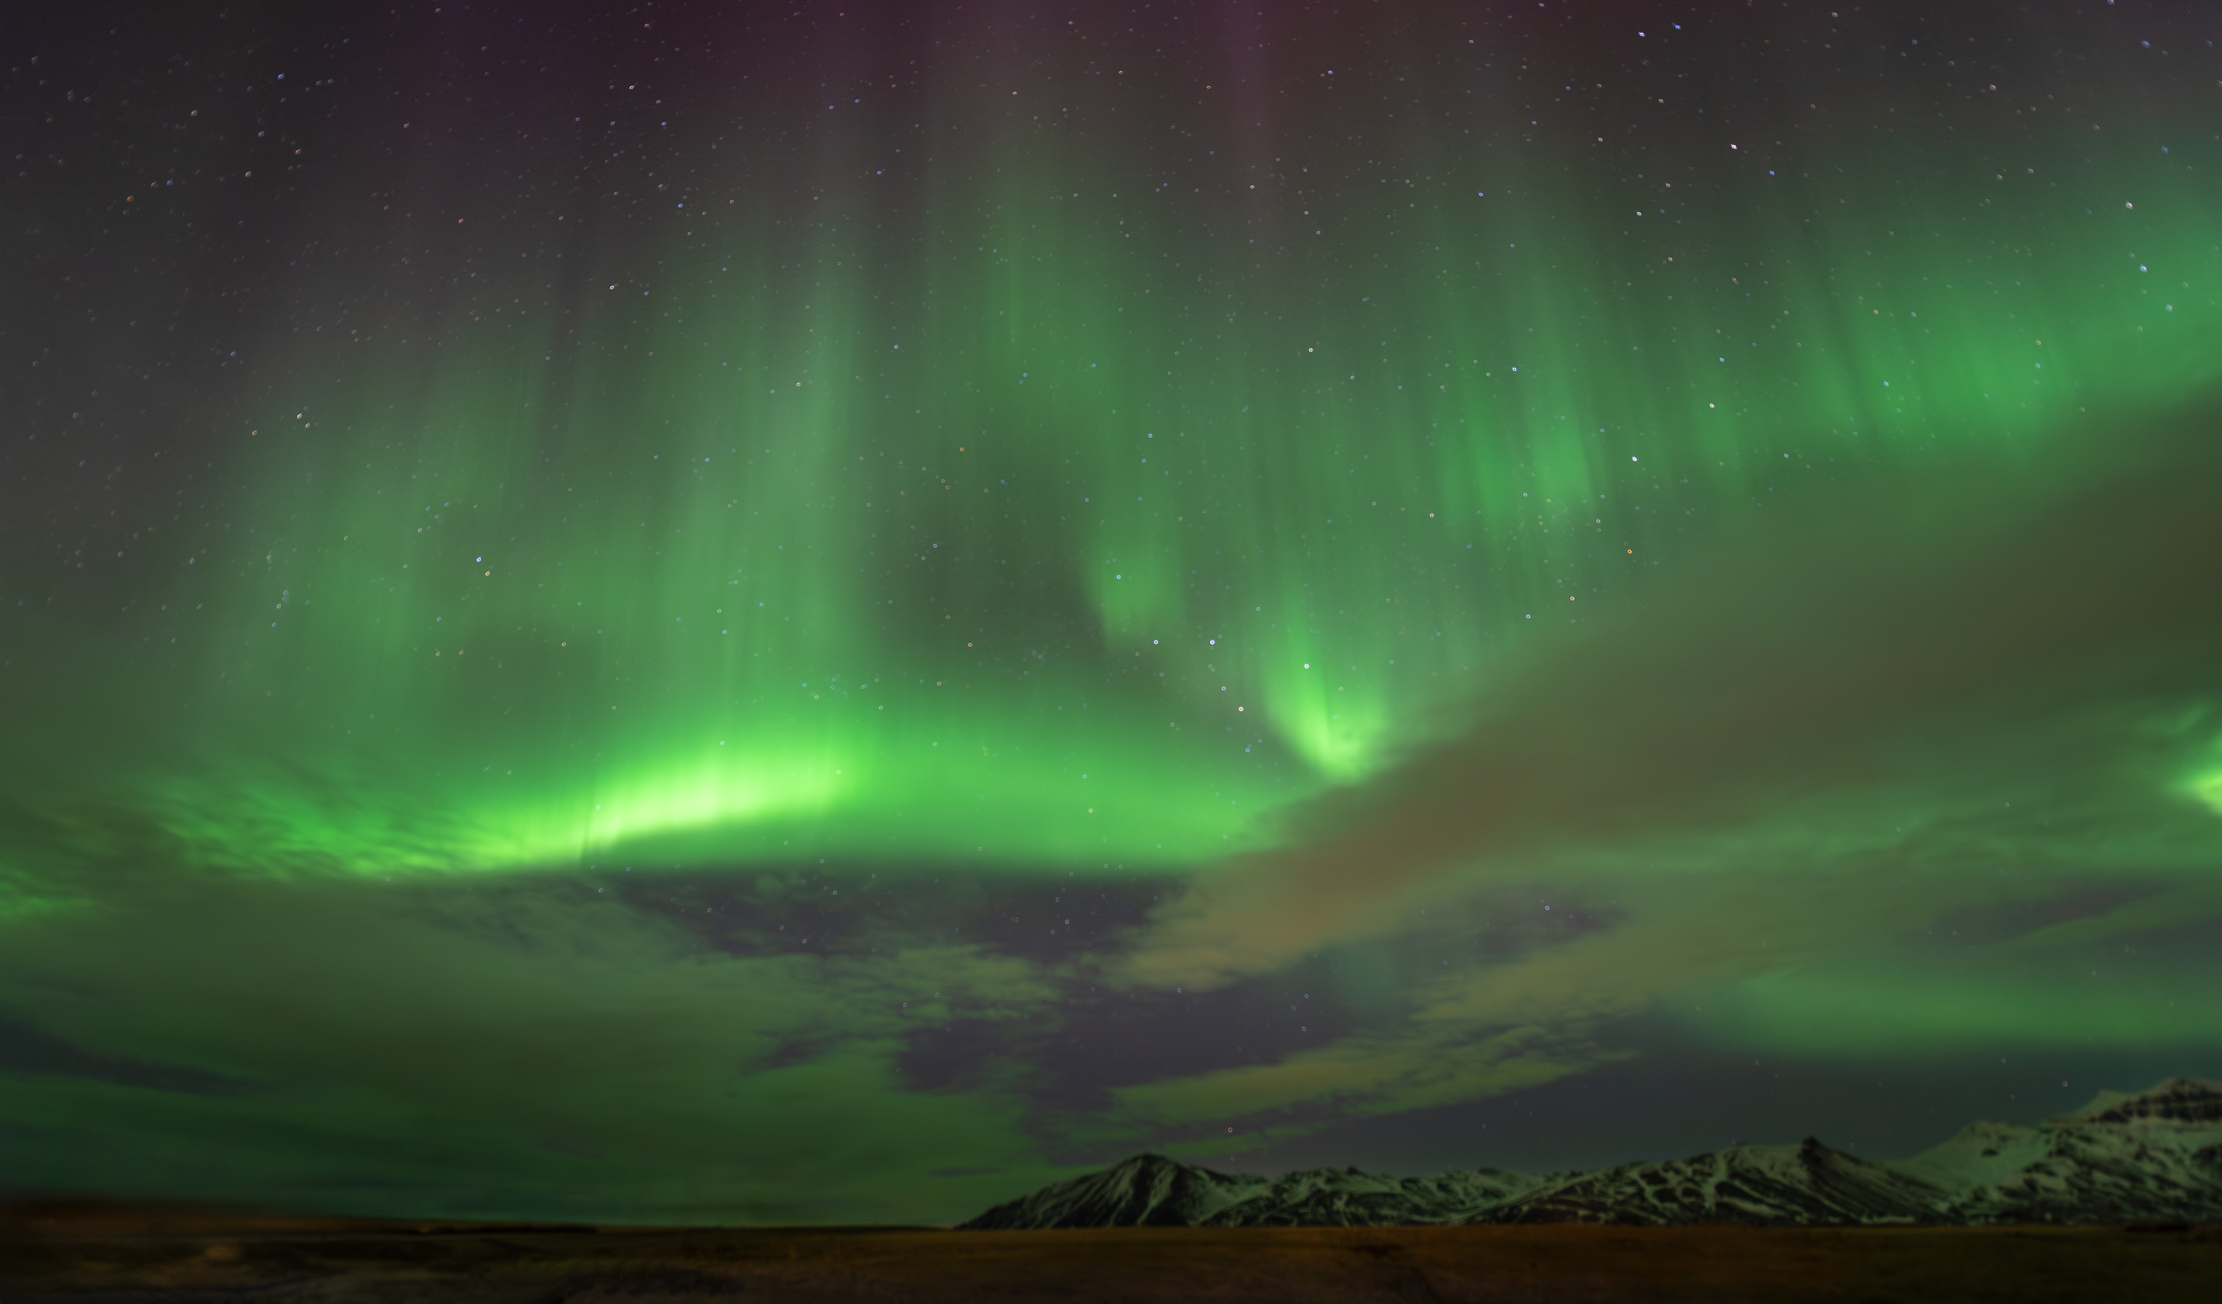
What started as a faint shimmer — the kind you convince yourself might just be your eyes adjusting — grew within minutes into one of the most intense aurora displays I have witnessed. Green curtains stretched across the full width of the sky, folding and moving with a speed that the word “shimmering” doesn’t really capture. I climbed out of the water, dressed as fast as I could, and photographed in the immediate surroundings with whatever time I had before the display began to fade.
The foreground is not what I would have chosen given an hour to prepare. The images are good anyway.
That is the Northern Lights in Iceland. The best displays rarely announce themselves politely. The photographers who come home with the strongest images are not always the ones who planned the most carefully — they are the ones who were ready to move when the sky decided to perform.
This guide will help you be ready.
When and Where
Season
The Northern Lights require darkness — which means they are impossible to photograph during Iceland’s summer months when the midnight sun keeps the sky bright around the clock. The aurora season runs from late August through April, with the peak months being October through February.
September and October offer a particularly useful combination: the darkness has returned, temperatures are not yet at their winter extreme, and the shoulder season means quieter roads and fewer people at the locations you want to use as foregrounds.
February and March are statistically among the most active aurora months — and the added benefit of increasingly longer daylight means you can scout locations in the afternoon and be set up well before dark.
Location
The single biggest enemy of aurora photography is light pollution. Reykjavík’s glow is visible across a wide area and will wash out all but the strongest displays. Getting away from the capital — even thirty to forty kilometres — makes a significant difference.
Dark sky locations worth knowing:
- The Snæfellsnes Peninsula — far enough from Reykjavík, dramatic foreground options including the glacier and coastline
- The Westfjords — among the darkest skies in Iceland, exceptional foreground variety
- South Iceland along Route 1 — Jökulsárlón, Vestrahorn, and the black sand coastline all offer strong aurora foregrounds
- Northwest Iceland — the area around Hótel Laxárbakki and the Húnafjörður region has genuinely dark skies and mountain foregrounds that reward preparation
- The Highlands (summer access only) — irrelevant for aurora season, but noted for completeness
The principle is straightforward: get away from artificial light, find a foreground with visual interest, and face north. Iceland’s low light pollution outside the capital makes this easier than in most European countries.
Forecasting Tools
Veðurstofa Íslands — the essential starting point
The Icelandic Meteorological Office at vedur.is provides both the aurora forecast and the cloud cover forecast that determines whether you will actually see anything. Check both, not just the aurora activity level — a KP index of 5 means nothing if Iceland is under complete cloud cover.
The aurora forecast uses a scale of 0–9 (the KP index). In Iceland, a KP of 2–3 is sufficient for a visible display away from light pollution. A KP of 4 or above produces displays visible even from moderately lit areas. Anything above 5 is exceptional — the kind of night that pulls people out of hot tubs.
Aurora Forecast
KP Index — what each level means for photographers in Iceland
The most important variable is cloud cover, not the KP index. A KP of 5 under full overcast produces nothing. Check the cloud forecast at vedur.is alongside the aurora prediction — if Iceland is under cloud, consider driving until you find a gap.
Check the forecast in the evening and again at midnight. Aurora activity fluctuates, and a quiet early evening can be followed by a strong display after 11pm.
Viewfindr
Viewfindr is a photography-specific tool that combines aurora forecasting with location scouting — showing you not just the predicted activity level but how it maps to specific shooting locations. For photographers who want to match a strong forecast to a strong foreground, it saves significant planning time. It is worth having alongside the Veðurstofa Íslands forecast rather than instead of it — the official source remains the most reliable for raw data.
A note on aurora forecast apps generally
There are dozens of aurora apps available. Most pull their data from the same NOAA sources and present it with varying degrees of accuracy and useful design. The two tools above cover everything a photographer needs. Resist the temptation to collect more apps — the limiting factor is almost always cloud cover, not aurora activity prediction.
Camera Settings: A Starting Point
Aurora photography requires manual mode. The camera’s automatic systems are not designed for this kind of light, and they will consistently underexpose or produce unusable results.
The baseline settings:
| Setting | Starting point |
|---|---|
| Mode | Full manual (M) |
| Aperture | As wide as your lens allows — f/1.8–f/2.8 |
| ISO | 1600–3200 |
| Shutter speed | 5–15 seconds |
| Focus | Manual — set to infinity before dark, verify with a distant light |
| White balance | 3500–4500K, or shoot RAW and adjust in post |
| File format | RAW — always |
How to adjust from the baseline:
- If the aurora is moving fast and you want to freeze the structure — shorten the shutter speed and raise the ISO
- If the aurora is slow and diffuse — lengthen the shutter speed and lower the ISO
- If the image is too bright — reduce ISO or shorten shutter speed
- If the stars are trailing — shorten the shutter speed
The “500 rule” gives a rough guide for star trail avoidance: divide 500 by your focal length to get the maximum shutter speed in seconds before stars begin to trail. On a 20mm lens, that is 25 seconds. On a 14mm lens, approximately 35 seconds. These are approximations — check your images at 100% and adjust.
Gear
Before You Go Out
Aurora shoot checklist — run through this every evening
Planning
Camera & Gear
Camera Settings — Starting Point
Clothing & Safety
Lens: A wide angle lens — 14mm to 24mm — captures the aurora across the full sky and allows fast apertures. This is not the place for a kit zoom at f/5.6.
Tripod: Non-negotiable. A shutter speed of 10 seconds requires the camera to be completely still. Iceland’s wind makes a lightweight tripod inadequate — bring something solid and add weight if conditions are particularly gusty.
Remote shutter release: Pressing the shutter button introduces camera shake. Use a remote release or the camera’s built-in timer (2-second delay) for every shot.
Batteries: Cold temperatures reduce battery performance dramatically. Carry at least two fully charged batteries per camera body and keep spares in an inner jacket pocket close to your body. A battery that dies in the cold will often recover partially when warmed.
Headlamp with red light: Essential for moving around in the dark without destroying your night vision or appearing in other photographers’ frames.
Warm clothing: This is not a comfort note — it is a practical one. Standing still in an Icelandic field at midnight in October is genuinely cold. Fingers that cannot operate camera controls end the shoot. Dress in proper layers, carry hand warmers, and do not underestimate the wind chill.
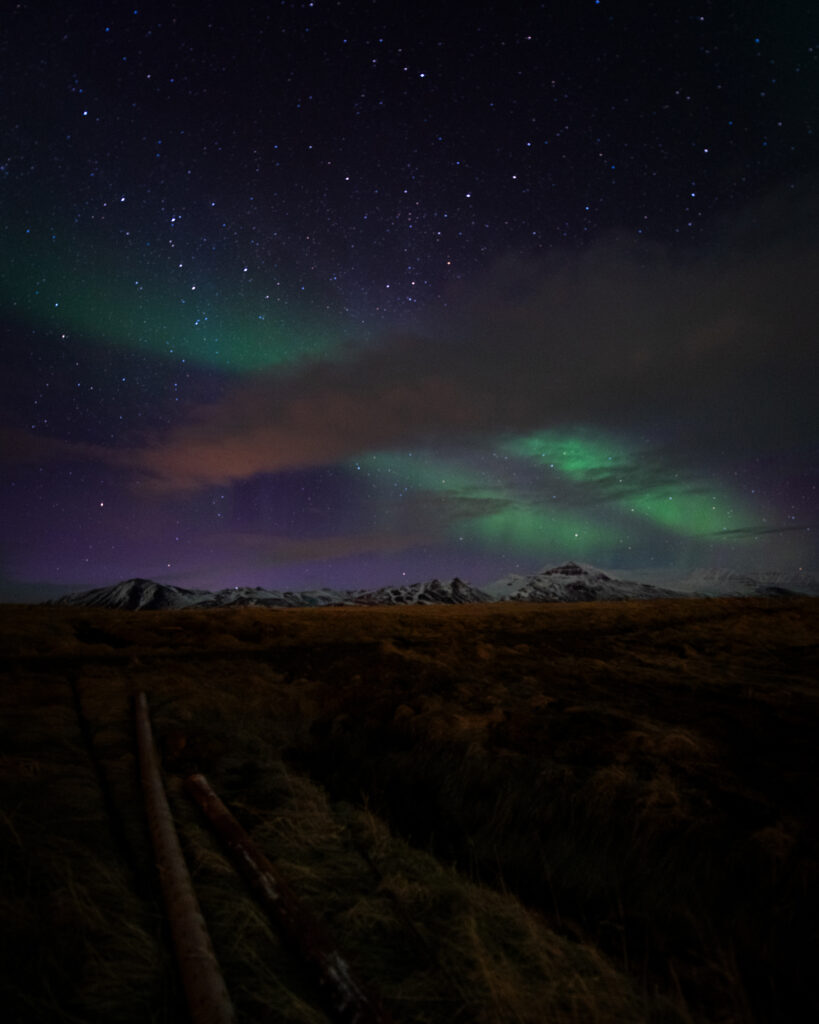
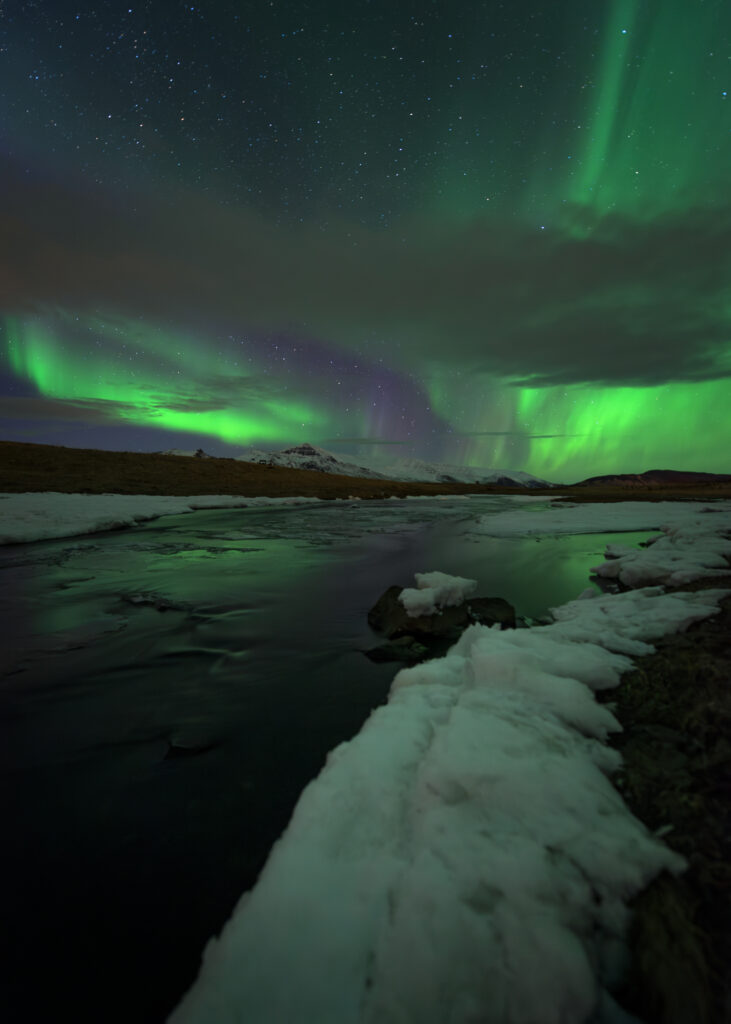
Composition: The Foreground Makes the Image
A green smear across a black sky is a record shot. A green aurora reflected in a glacier lagoon, or arching over a rusting shipwreck, or framing a snow-capped mountain range — that is a photograph.
The foreground is the variable that separates aurora images. Iceland offers extraordinary options within reasonable driving distance of most accommodation:
- Water reflections — glacier lagoons, fjords, and rivers all mirror the aurora when conditions are calm. Jökulsárlón is the classic; lesser-known alternatives exist along the south coast and in the Westfjords
- Mountains — snow-covered peaks provide natural scale and a defined horizon
- Structures — the Garðar BA 64 shipwreck in the Westfjords, farmhouses, lighthouses
- Lava fields — the texture of Iceland’s lava at night, lit by aurora, has a quality that nothing else replicates
Scout your location in daylight. Arriving at a potential aurora foreground for the first time in complete darkness, with a display overhead, is not the moment to be working out where to stand.
A Note on Responsible Behaviour
Aurora photography draws photographers into dark, remote areas at night — often off the main roads and onto private or protected land. A few reminders that apply specifically to night shooting:
Stay on tracks and paths. Iceland’s vegetation is invisible in the dark and equally vulnerable to footsteps. If you cannot see where you are walking, walk on rock or on an established path.
Do not trespass. The aurora is not a licence to walk onto private farmland or into protected areas. The best foregrounds are accessible from public land.
No light painting on protected surfaces. Using a torch to illuminate foreground elements is a legitimate technique — but directing artificial light at vegetation, moss, or nesting areas causes disturbance. Light your foreground structures, not the landscape itself.
Tell someone your plan. Going out alone at night in rural Iceland in October or winter requires basic safety practice. Leave a note, share your location, and carry a charged phone.
What to Do When the Forecast Is Wrong
It will be wrong sometimes. A KP of 4 with full cloud cover produces nothing visible. A KP of 1 with a sudden geomagnetic disturbance can produce a display that fills the sky.
The practical approach:
- Check the forecast at 9pm, midnight, and 2am — activity often peaks in the early hours
- If cloud cover is the problem, drive. Iceland’s weather is intensely localised — a forty-minute drive can take you from full overcast to a clear sky
- If the aurora doesn’t appear, use the time to practise your settings and find your foreground for the next attempt
Patience is the skill that aurora photography rewards most consistently. The photographers who see the strongest displays are often the ones who went out on the quiet nights and were already in position when conditions improved.
Further Reading
- Best Time to Visit Iceland for Photography — seasonal breakdown including aurora season
- Iceland in Winter for Photographers: October to March
- Photographing the Westfjords: Iceland’s Forgotten Region — includes the Garðar BA 64 shipwreck as a foreground location
- Leave No Trace in Iceland: A Photographer’s Guide